To take your first shots you need to load the camera with 35mm film. The film can be purchased and developed everywhere.
To make sure that your images are correctly exposed you must adjust the aperture setting on your camera to match the film you are using and the environment that you are shooting in. The Lomography Spinner 360° has two aperture settings: f/16 (sun icon) and f/8 (cloud icon). The shutter speed (i.e. the rotation speed) of the camera lies between 1/125 and 1/250 of a second. The sunny/cloudy setting on the camera is designed for use with a standard ISO 400 film. Practically you should keep 3 points in mind:

The Lomography Spinner 360°’s rotation speed is between 1/125 and 1/250 of a second and makes the camera especially suitable for shooting outdoors in daylight. If you are in low light conditions (indoors, artificial light settings etc.) you can make the camera turn slower by releasing the cord slowly by hand. For long exposures hold the camera’s Handle in one hand and turn the camera with the other hand. That way you can manually adjust the shutter speed of the camera.
After shooting up to 8 panoramas your film comes to an end. You will realise this when the Cord doesn’t go inside the Handle anymore and the camera doesn’t turn anymore. It’s now time to rewind your film:
Remember that when holding the camera in front of you (as you would with other cameras) you will always be in the picture. To avoid this you must either be invisible or use a different shooting position/technique. For some suggestions check out the Lomography Spinner 360° Shooting Techniques section.
Experiment with the endless possibilities of shooting with the Lomography Spinner 360°. Each angle and each movement makes a real change in the final result. This camera makes you shoot in a completely different way than you are used to. Go wild!
When you shoot you should always hear a ’buzz’ coming from the camera. This is a good sign because it means that the film is advancing inside the camera and that you are therefore taking pictures. If you don’t hear any sound while the camera is turning, its Aperture Setting is most probably set to ’R’ – which means that the aperture is totally closed and you are not shooting any pictures. As long as your Aperture Setting is either set to ’sunny’ or ’cloudy’ the camera will make a buzzing sound and is operating properly.
You don’t always have to take 360° pictures. For example, if you want to shoot just a 180° picture pull the Cord only halfway and release it. The camera will perform only half a rotation. You can also turn the camera manually for any angle you wish from 1° to 360°.
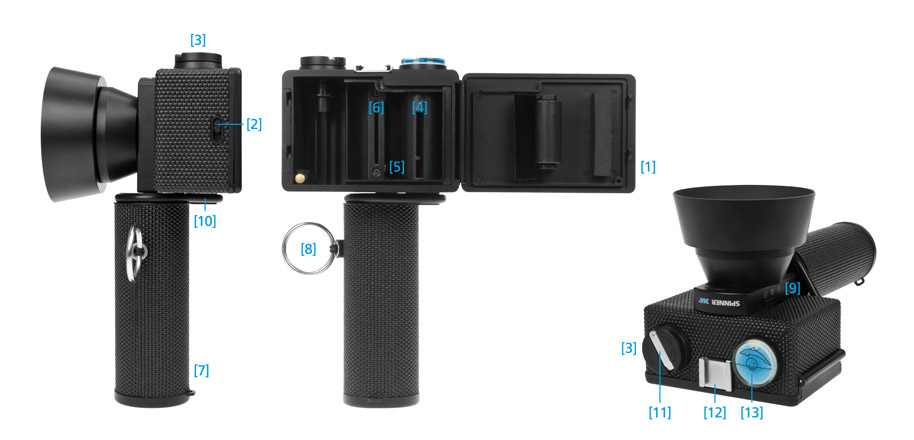
Use the Water-Level on top of the camera to check the angle you are shooting with. If the bubble is right in the middle of the Water-Level your camera is perfectly balanced and ready for an even landscape shot.
Now that you’ve shot your first rolls of film it’s time to develop them.

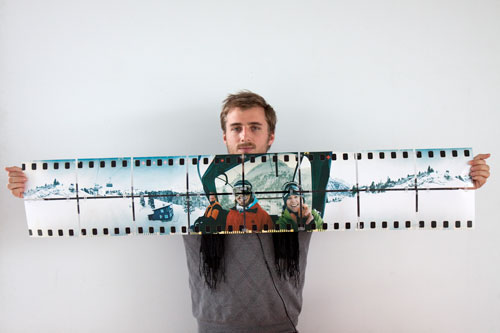
As the Lomography Spinner 360° uses 35mm film it won’t be a problem to develop your films even if you’re in Alaska or Bora Bora. However, no matter how friendly and well-disposed your lab is, you need to inform the guys there about the extraordinary format you’re handing them over. They have probably never developed an image that long and could do something wrong if they don’t know about it. Tell your lab about the Lomography Spinner 360° and inform them that the pictures you took are about 4 times as long as a conventional landscape picture. Usually a Lomography Spinner 360° picture is about 23cm (9.1 inches) long on the actual film. The best option is to ask your lab to develop your film and then hand it back to you without cutting it. This is economical and gives you many possibilities in the aftermath.
With the developed and uncut film in your hands you can choose to either ask the lab to scan your negatives for you, or scan them yourself using a flatbed scanner with a backlight unit.
Asking your lab to scan the negatives for you is fine but it can also be expensive plus you have less control over your image. We therefore suggest you scan your Lomography Spinner 360° film yourself using a flatbed scanner with a backlight unit; it’s more economical in the long run and gives you ultimate control over the colours, tones, saturation and resolution of your images. Today you can get a high quality scanner for a reasonable price. It’s definitely a worthwhile investment for any serious Lomographer.
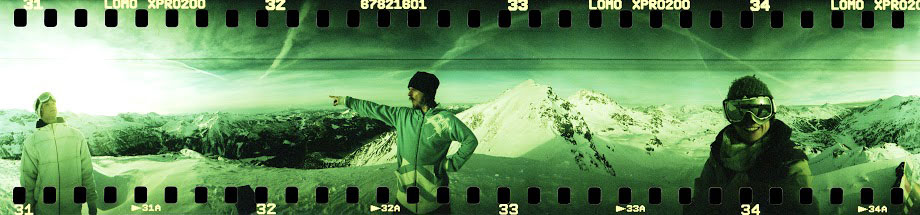
When scanning your negatives you should take care to scan the whole film including the sprocket holes. The Lomography Spinner 360° exposes the sprocket holes of your film, which gives your images a unique look. A lot of film masks (probably even those that professional labs use) automatically cover the sprocket holes of 35mm films – don’t let these evil masks take away the sprocket hole beauty of your film! If you do the math you realise that exposing the sprocket holes, like the Lomography Spinner 360° does, allows you to get nearly 40% more out of each image. You won’t give up on that, will you? Plus the sprocket holes simply look sexy and are unique to 35mm analogue photography.

We suggest you scan your images at a resolution of 1200 dpi. This results in an image of approx. 1600 x 11000px and is big enough for proper printouts later on. You can also easily compress this image for uploading and sending via email.
If you plan to print your images in a really big format you should go for scanning at a resolution of 3200 dpi or higher. By doing that you truly get the most out of your 35mm film and can print your images at sizes of 1 metre or longer!
Some scanners are not used to seeing sprocket holes, which results in your images appearing in distorted colours. To fix this problem check out the “advanced options” setting in your software and change from “automatic” to “manual” mode.
Check if the usual scanning mask hides or covers specific parts of the scanning area within the scanner. Some scanners have their idiosyncrasies and have certain areas where a negative shouldn’t be placed while scanning. Know your scanner and you’ll be satisfied with your results.
Read your scanner’s manual + software carefully. There are a lot of tips and tricks to know and the more you know, the better you’ll be at scanning.
Learn more about the basics of and discover cool scanning tips with our ultimate guide to scanning.
Uploading your images to your LomoHome and emailing it to your friends is nice and cozy – but nothing compares to a real life print that you can smell, touch and feel. In fact, you can do so much with Lomography Spinner 360° images that it’s an absolute must to print them out. You can make your own large format posters, create postcards, illustrate your living room and toilet and make the best works of art and presents to the world. Here we present a few options of what you can do to make your Lomography Spinner 360° dream become a reality.
Standard Steve: let the lab print your images in standard formats.
Patchwork Pete: divide your image in several parts, print them bit by bit and stitch ‘em back together for an amazing large scale panorama.
Large Scale Lucy: professional labs offer large scale prints on various materials. Choose this option for printouts of 1 metre or longer!
Ask your lab what is the biggest print size their normal printing machine can do. A minilab that is operated by most labs can usually do prints up to a maximum length of 30cm (11.8 inch). This is a good size for a normal Lomography Spinner 360° print keeping in mind that the height/length ratio is about 1 to 5. If you print your image shorter than 30cm the height of your image will also go down and you won’t be able to see much of that image anymore. Thus, 30cm in length is the way to go.
If you’ve got a full length 360° panorama, the height of the image will be about 4.5cm (1.8. inch). However, as you can also shoot partial panoramas with the Lomography Spinner 360°, it depends a lot how long each image you want to print really is. The best thing is to show the lab technician your negatives and scans and choose the best printing option together.
But what if there’s no expert around? For example, if you order prints online, in the drug store or via mail order? There’s a trick: most labs do standard prints up to A4 size (a standard size used in most countries in the world). The length of such a paper is 297mm, that is approx. 30cm and thus perfect for a Lomography Spinner 360° printout. However, the height of an A4 paper is 210mm, and that’s enough to fit 3 to 4 Lomography Spinner 360° images on it. The twist is: you manually assemble 3 to 4 scans of your image in a document exactly the size of A4 (210 x 297mm) and print this file. This results in letter-sized photographs with 3 to 4 Lomography Spinner 360° images on it. Next you just take a pair of scissors and cut your photographs out.
Voilà, you’ve now got your Lomography Spinner 360° images beautifully printed out in a standard size any lab should be able to do!
This is an amazing option that really shows the beauty of 360° panoramas. Instead of printing one large image you divide your picture into several parts and print it out bit by bit. When you have all the images in front of you, stitch them back together to make a wonderful giant image. Considering that photo prints don’t cost more than a few cents nowadays, this is an option low in cost and effort with breathtaking results.
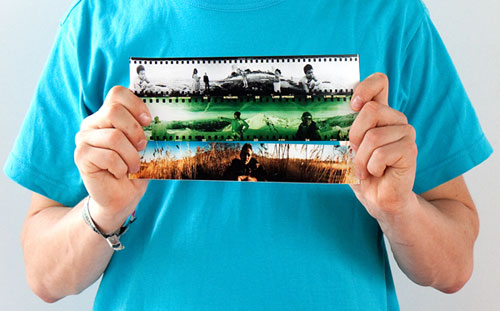
Lomography Spinner 360° images come out wonderfully when printed on 3 to 4 seperate images of 13x18cm each. The images are put back together using an adhesive panel. Any lab, mail order service or drugstore will print photos in a size of 13x18cm (5.1x7.1 in). All you have to do is split your panoramic image in parts that are exactly this size, send them to print and stitch ‘em back together. Depending on the size you want your images, you can divide your panorama in 4 parts, 8 parts, 16 parts or even 36 parts – this results in an image of 1 metre or longer!
But how do you divide your images in several parts and be sure they are printed out to your liking? We’ve got a little tutorial for you that tells you the basics of the Patchwork Pete.
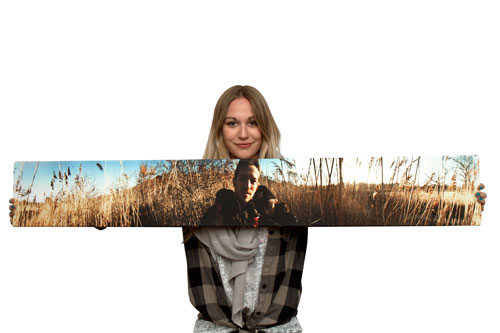
If you’re not really into stitching and DIY, there’s the large scale print option in professional photo labs. Pro labs have special printers that can print out images in one go – usually the sizes range from 30 x 45cm (11.8 x 17.7 in) to 100 x 200cm (39.4 x 78.7 in) or larger. There’s a variation of materials too, from classic photo paper to linen and translucent materials. Just ask your lab of choice what they have on offer to make the best choice for you.